Search This Blog

Friday 29 June 2012

Neck and Shoulder Pain

Neck and Shoulder pain is an extremely common complaint, and there are many common causes of this problem. It is important to make an accurate diagnosis of the cause of your symptoms so that appropriate treatment can be directed at the cause. If you have Neck and shoulder pain, some common causes include: 
  • Abnormalities in the bone or joints
  • Trauma
  • Poor posture
  • Degenerative diseases
  • Tumors
  • Muscle strain
  • Poor posture

The shoulder is a ball and socket joint with a large range of movement. Such a mobile joint tends to be more susceptible to injury. Shoulder pain can stem from one or more of the following causes:
  • Strains from overexertion
  • Tendonitis from overuse
  • Shoulder joint instability
  • Dislocation
  • Collar or upper arm bone fractures
  • Frozen shoulder
  • Pinched nerves (also called radiculopathy)
Due to continuous pain in an over strained muscle there are tendency to develop myofascial trigger point because of which there will be continuous dull and nagging pain in the muscle.

Trigger points, also known as trigger sites or muscle knots, are hyperirritable spots in skeletal muscle that are associated with palpable nodules in taut bands of muscle fibers.
The trigger point model states that unexplained pain frequently radiates from these points of local tenderness to broader areas, sometimes distant from the trigger point itself.

Compression of a trigger point may elicit local tenderness and or referred pain.

Pictures shown below are the common sites of myofascial trigger point pain :-

 Neck and shoulder muscle myofascial trigger points causing referred
 pain.


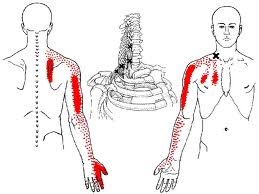
 Pain radiating down throughout the arms and fingers.


Trigger point release :-
Trigger Point therapy can reduce pain, increase movement, and allows the muscles to
lengthen and become stronger again. To treat Trigger Points, heavy pressure must
be applied to the Trigger Point. Light pressure is not effective for treating Trigger
Points, and in fact may increase spasms as the muscle tries to protect itself, leading
to increased and more constant pain. In contrast, moderate to heavy pressure
applied to a Trigger Point causes the pain to initially increase, but then as the
muscle relaxes the pain will fade.
 
Pressure should be applied slowly and released slowly for best results. The pressure
should be maintained until there is a change in pain. If there is no decrease in pain
after one minute, stop the pressure—this is probably not a Trigger Point! After
applying pressure to Trigger Points, the relaxed muscle should be stretched. If the
muscles are not returned to normal length, there is a greater likelihood the Trigger
Points will reoccur. Stretching is safer and less painful after the Trigger Points have
been treated.


Few self trigger point release techniques:-

Please consult your Physiotherapist before applying these techniques.


Physical Therapy: Physical therapy is an important aspect of treatment of almost all orthopedic conditions. Physical therapists use different modalities to increase strength, regain mobility, and help return patients to their pre-injury level of activity.

Tuesday 26 June 2012

EXERCISES FOR FLAT FOOT

Flat foot / Pes planus :- 

Flat foot/Pes planus is a condition where the arch or instep of the foot collapses and comes in contact with the ground.


EXERCISES FOR FLAT FOOT


The Exercises for the treatment of Flat Feet are-
  • Toe clawing: The toes of the foot are flexed (bend/contraction) fully; hold in that position and then release again…extend (stretch) them fully. Repeat this 10-15 times, thrice a day.
  • Toe spreading-The toes are pulled away from each other and then towards one-another
  • Rising the inner border of the foot-The foot is slightly inverted (the internal arch is raised), but the sole is not turned upwards. The height of the arch is increased, whilst the toes are still gripping the ground.
  • Foot-closing-Making fist with foot, relax and then repeat it again.
  • Active foot rolling. The patient tries to draw an 'O' with his/her big toe in sitting position. For the right foot clockwise; for the left foot anti-clockwise.
  • Picking up small logs (of different sizes) through foot, releasing them and then picking up again.
  • Standing on the outer borders of the foot, hold it for 10 seconds, relax and then repeat it again.

  • Toe flexion and extension while standing on the edge of the stairs with toes of the stairs.
  • Walk on a straight line
  • Walking on the lateral border of the foot
  • Curved foot walking: It involves walking with the foot in arched position and touching the heel and the toe on the ground with the center in arched position. This will help the foot developing the arch. 
  • Heel walking: It involves walking on the heels with the whole body weight on the heels.
  • Toe walking: It involves walking on the toes to strengthen the intrinsic muscles of the foot.

Cervical Spondylitis


A very common disorder, normally seen in the elderly from the age of 55 onwards, cervical spondylitis today is increasingly frequent in the younger age group from 35 to 45 years of age. There are several reasons for this

  Causes


This is basically a mechanical disorder.
  • Very stiff muscles in the cervical region can, over the years, cause a kinking of the cervical spine to the front.
  • Bad posture and lack of exercise to the cervical region are the key factors which are responsible in a majority of the patients.
  • Lying in bed with several pillows can affect the alignment of the cervical column, causing a forward inclination.
  • Reclining on sofas with the spine hunched and the neck pushed forward is bad for cervical alignment.
  • Hunching over the computer for many hours, occupational hazards such as those of a writer, an illustrator or a painter, all cause the spine to be bent forward all the time.
  • Positioning the body to the same side during sleep, with the shoulder muscles and the neck compressed, also develops faulty alignment in the cervical spine. In due course the spine is bent, the front surface of the bones and disc are excessively pressurised and damage occurs.
  • The so-called executive chairs are ill-designed and push the neck out of alignment. No chair should reach over the head. The level should be up to the shoulder blades so that the chest can stretch over the edge keeping the body upright.
According to survey in India, railway porters carry heavy loads on their heads but they do not suffer from cervical pain (as one would expect) from the heavy load they carry every day. Only in the group of people who never exercise their bodies does this occur most frequently.

  Symptoms


The most common symptom is pain in the neck, worsening with exertion and relieved, in the early stages, by rest. This pain often radiates down to the hand, with the fingers becoming numb due to compression of the nerves. The shoulder area becomes tender and painful. A nodule can form in the muscle due to chronic pressure. The symptoms of cervical cord compression can sometimes be severe. The pain radiates down the right or left arm to the fingers, to the chest and shoulder blades depending on which side the nerve root is involved. It can become continuous, making movements painful and limited. If the cervical vertebrae become unstable, the danger of cord compression is imminent and, in some cases, fusion of the bones may be warranted. But this is rare.

Physiotherapy Management

  • Moist heat therapy for 10-15 min.
  • Static neck exercises:-
Static Extension
  • Static Extension

    Static extension strengthens the muscles on your neck that move your head backward so you are looking upward. To perform the exercise, first stand or sit upright with your head in a neutral position and place your hands behind your head. Then push into your head with your hands and resist with your neck muscles so your head does not move. Hold for five seconds or more, and then relax.

     Static Flexion

    Static Flexion
    Static flexion works on your neck flexor muscles--those that move your head forward so your chin moves toward your chest. Like static extension, to prepare for static flexion, hold your head in a neutral position, but place your hands against your forehead instead of behind your head. Then, to perform the exercise, press your hands into your head and resist with your neck flexors so your head does not move. Hold for at least five seconds before relaxing.

    Static Lateral Flexion (side flexion)

    Static lateral flexion
    Static lateral flexion exercises the muscles that flex your neck from side to side--ear to shoulder. To perform the exercise, from the same starting position and static extension and static flexion, press into either side of your head with your hand on the same side. Then resist the force applied by your hand with your neck muscles so your head remains still. Hold for at least five seconds and then repeat on the opposite side.


    Static Rotation

    Static Rotation
    Static rotation strengthens the muscles that rotate your head to either side so your chin moves over your shoulder. To prepare for the exercise, look forward and place your right hand over your right cheek . Then, to perform static rotation, try to turn your head to the left by pushing with your right hand, but resist with your neck muscles so your head remains steady. After holding for five seconds or more, repeat the exercise with your left hand against the left side of your head.

     Look front and do not move your neck during static neck exercise


    Range of Motion Exercises

    Each of the exercises mentioned above can be performed with less manual resistance to allow your head to move through functional ranges of motion. For example, you can perform a flexion exercise by pushing into your forehead and allowing your head to move backward through slight resistance from your neck muscles throughout the movement.


Monday 25 June 2012

Ergonomic computer workstation

 Computer related ailments and its cure

People who spend long periods of time on their computer often suffer from computer related aliments such as headaches, eyestrain, neck & shoulder pain and back pain. These complaints can be prevented using these simple tips.

  • Looking at the computer screen for long periods can cause eyestrain, headaches and double vision. Give your eyes a 15 minutes break every 2 hours or so. Make a habit of looking away from the monitor on regular intervals. Focus on an object about 10 to 12 feet away. Try typing in a large font that is comfortable for your eyes, you can always change the size when you are done before printing or e-mailing it.
  • Avoid using computers that flicker. If there is too much of light in your office that is causing a glare on your screen, change the position of your computer to minimize the glare. You could also use special antiglare screen coatings and shield that are very effective in keeping out the glare. Check your room lighting and make sure that your screen is three or four times brighter than the room light.
  • To avoid back and neck pain make sure you choose a workstation or desk that is recommended for computers. The computer desk should be at the correct height which is comfortable when working with the keyboard. Your office chair should be adjustable to your height, provide good posture and give maximum support to your back. If your chair does not provide you with a comfortable back support try using a footrest to raise your legs.  

It is now very important to have suitable and ergonomically designed workstation in any office.

Picture shown below are different kinds of Ergonomic workstation:- 

An advance workstation for IT Professionals

Correct sitting Posture for computer professionals


Sunday 24 June 2012

Mind your Posture

Posture Related Problems
Over time, poor posture may be caused by habits from everyday activities such as sitting at a desk, looking at the computer, driving, standing for long periods of time, or even sleeping. Poor posture can easily become second nature, causing or aggravating episodes of back pain and damaging spinal structures. Physiotherapists can teach you the correct tools to promote a better posture and therefore decrease your risk for aches, pains and sporting injuries caused by bad posture.

A correct posture means that the key body parts stack vertically on top of each other therefore maintaining the two natural curves at your back.

There are 5 key benefits from maintaining a good posture:
• Facilitates breathing
• Increases concentration and thinking ability
• Improve your image
• Feel even better about yourself
• Avoid health complications (increased risks of slipped disc, back aches, back pain, pressure inside your chest, poor blood circulation)

Monday 4 June 2012

Tennis Elbow

Tennis Elbow also known as Lateral Epicondylitis
This is a painful condition of the elbow caused by overuse. Not surprisingly, playing tennis or other racquet sports can cause this condition. But several other sports and activities can also put you at risk.
Tennis elbow is an inflammation of the tendons that join the forearm muscles on the outside of the elbow. The forearm muscles and tendons become damaged from overuse (repeating the same motions again and again).

This leads to pain and tenderness on the outside of the elbow.

Physiotherapy treatment helps a lot to improve from this condition.

 Homecare: Applying moist heat at painful area is much effective.Avoid any activity which aggravates the pain such as squeezing, stirring, chopping etc.

Sunday 3 June 2012

Frozen shoulder

Frozen shoulder, or adhesive capsulitis, is a condition that causes restriction of motion in the shoulder joint. The cause of a frozen shoulder is not well understood, but it often occurs for no known reason. Frozen shoulder causes the capsule surrounding the shoulder joint to contract and form scar tissue.

Signs & Symptoms:
Frozen shoulder
Shoulder Joint
  • Severe night pain and waking 
  • Inability to lie on your side at night
  • Can’t brush your hair
  • Can’t brush your teeth
  • Can’t reach to your back pocket
  • Can’t lift your arm
  • Increased sweating Frozen Shoulder is a clinical diagnosis and is only very rarely the result of an underlying disease. Fortunately (and curiously) once cured it (almost) never comes back on the same shoulder.

    • It can be treated through intense physiotherapy and few home care exercises.
    • Exercises for frozen shoulder :- 
     
  •  Codman's ex's :- Place your unaffected hand over the table by leaning forward and swing affected hand in the air like a pendulum and in circular motion ( clockwise and anticlockwise) at least for 30-40 repetitions & twice a day. After a weak you can do this ex's with 1 kg. of weight.( 1 kg salt pkt./ water bottle).
  • Finger Ladder ex's :- Place your fingers on the wall and walk it up as much as you can and then slide it down, repeat it several times.
 
Codman's and finger ladder ex's
Overhead pully ex's


  •   Pully ex's :- Hold a rope in both of your hand attached to overhead pully, try to pull one side and let other hand go up as much as you can. Do it frequently for both sides.


  • Self shoulder stretching ex's :- 
Shoulder stretching ex's


"I have treated many patients suffering from frozen shoulder and remarkable result has been achieved within 15 days of continuous treatment."

Saturday 2 June 2012

OSTEOARTHRITIS REHABILITATION OF KNEE AND HIP


OSTEOARTHRITIS REHABILITATION OF KNEE AND HIP
The old slogan, “Move it or lose it,” goes double, or perhaps triple, for people with osteoarthritis
Years ago, arthritis was treated with rest and immobilization. Scientists have since learned that locking up the joints actually makes them worse.
There’s a huge body of literature demonstrating that keeping the hips and knees moving, and the muscles around the joints strong, contributes greatly to protecting the joints and staving off additional damage caused by arthritis,
People with knee and hip osteoarthritis have limitations, Which exercises can you do to make the most of your mobility without increasing pain or risking injury?
                Exercises to Avoid With OA of the Knee or Hip:
·         Running and jogging. “The difference between how much force goes through your joints jogging or running, as opposed to with walking, is sometimes more than tenfold your whole body weight,
·         Jumping rope.
·         High-impact aerobics.
·         Any activity where, at any time, you have both feet off the ground at once, however briefly.
Exercises to improve OA of the Knee or Hip
Cardiovascular Exercise
Good cardiovascular exercises for people with knee and hip osteoarthritis include walking, swimming, and cycling. “Really, it’s anything that you can tolerate that gets your heart rate going,
If you can take a brisk walk, it can keep you mobile and help to reduce pain. If walking for exercise is too painful, try a recumbent bicycle. “These bikes extend the angle of the joint so that the knee and hip aren’t flexing so much with each rotation, so that it might cause less strain and pain,
If even the recumbent bike is too much, the swimming pool is your friend. “It feels great on the joints!”  “You must find a pool that is heated, because cold water is very painful for arthritic joints. The only downside to swimming is that it doesn’t give you the delay of bone loss that is a key benefit of weight-bearing exercise.”
Muscle Strengthening Activity
You might think that lifting weights would be bad for arthritis, but some studies show that the opposite is true. By strengthening the muscles around the joints, strength training helps to take some of the load off the arthritic joints and relieves pain. The job of connective tissue is to hold things together, so you’re losing stability in the joint, part of what’s causing the pain. When you strengthen the muscles surrounding and supporting the joint, you can relieve some of the symptoms,

Flexibility and Range of Motion
There are a number of specific exercises that you can do, designed to be easy for people with osteoarthritis, to increase your flexibility and range of motion around your knees and hips.
“We want to do activities without force that bring the hips and knees through the full range of motion in a general, unforced manner, allowing the joint to lubricate itself and help to heal the damage; you can do these stretching exercises in a pool, or on a mat near a wall for support.
Before starting an exercise or flexibility training program, check with your Physiotherapist. Depending on your ability and comfort level, try these exercises 2 to 3 times per week and gradually work up to doing the exercises daily.
Hip Exercises
·         Leg swings. Simply hold onto the edge of the pool, or the wall if you’re on land, and gently swing your leg out to the side, alternating sides. “The pool is particularly good for this, because the buoyancy assists you and you get a better range of motion, and  you also have resistance from the water that makes your muscles do more work,

·         Leg extensions. In the same position, extend your leg gently backward, alternating legs. As with all range-of-motion exercises, “If your hip is very tight, and you try to bring it behind you and it doesn’t move backward very well, you can end up overarching your back and causing back problems by doing it incorrectly.

Knee Exercises
·         Straight leg raises. Sit in a chair, straighten one leg, and raise it straight out in front of you. Alternate legs.
·         Leg curls. If you are nimble enough, lie on the floor on your stomach, and gently bend your heel back toward your buttocks, making sure to keep your hips on the ground.
All of these exercises should be done without weights. “In general, it’s not a good idea to put a weight on the ankle and bend and straighten the knee. That puts a lot of torque on the knee that can exacerbate arthritis. Instead, if you want to add weight, it’s better to use something like the full leg press machine, which has you lie down and push a plate up. With those, your full body weight is somewhat unloaded from the joint.”


Friday 1 June 2012

Spreading trust and care

Welcome to my blog, hope you will enjoy the knowledge...
Thank you
Dr. Amit